3.30.2016

Made for Baby – DIY Tutorials


When Eden was born, we had been house hunting and hoping to get into a place beforehand. We ended up moving in three weeks after she was born so for her first three weeks of life, her things were piled in the living room of our one bedroom apartment. I wasn’t able to organize very well, and she being my first baby, I didn’t know what things I really needed or wanted for a little one. It was really hard to play catch up and get organized and get things we needed (once we realized we needed them) after she was born.

This time around, I was determined to not let that scenario play out again. I began nesting really early, or maybe my motivation came purely from my lack of organization surrounding Eden’s birth. I felt relieved to know the things I needed or wanted this time around and so I broke out my sewing machine and got started (as soon as my first trimester and the nausea was behind me).
I may sew some more things…like bow ties are definitely in the future, but for now I wanted to try and create a one stop of diy tutorials that cover everything you need for baby or items I found very useful to make. Here they are and here are the tutorials I used for them:

Towel Backed Burp Cloths Tutorial

I was given towel backed burp clothes at my baby shower for Eden and they were probably the most used item I received. In fact so used, that they started falling apart at the seams and had some nice stains going on by the time she had outgrown them. So I ended up tossing them. When I learned of our little guy on the way I knew I NEEDED some and so I searched for some fabric and a tutorial and made a whole stack…because you can’t really have too many burp cloths on hand. The tutorial I found here used flannel fabric for both sides, but I highly recommend replacing a side with towel, cause man it soaks up way more! I also really loved the shape/design of these burp cloths.


Knotted Baby Hats Tutorial

I always worried that my bald little Eden (you’d never know she was a bald baby by her hair today) was too cold at night or even in the day. She was born in the middle of the spring and even though warm months were upon us, she went from a warm tummy to living in the AC – which we kept blasting in the summer months.  So it didn’t matter if it was a hot desert outside, I worried about her being warm enough and so, I felt really good about keeping a little hat on her head. Along with that, since this little guy won’t be wearing pretty bows on his head, I thought it would be fun to make him a good assortment of knot hats using this tutorial.


Baby Mittens Tutorial

When Eden was born, it didn’t take long to realize that she was going to be pretty good at decorating her cute tiny face with scratches, as some babies do (maybe I passed that onto her since it sounds like I was pretty good at it as a baby as well). We had some baby mittens for her hands, but a lot of the time they would get flung off as she flailed her little newborn arms around and if we didn’t notice in time she would put a nice scratch or two on her skin. I found that sock actually stayed on better, but looked a little funny. I am not sure if this little guy coming will be a face scratcher, but I wanted to be prepared and I hunted for some mittens that would stay on. I found some on Amazon that had a pretty long wristband and the reviews claimed they were worth the $12 per pair since they actually stayed on.  I knew I would need more than one pair and didn’t exactly want to fork out a couple dozen dollars, so I set out looking for something similar that I could make and stumbled across this tutorial. These mittens have two layers and I remember how sweaty Eden’s little hands got in her gloves, so I opted to just do the outer layer and not worry about the uncovered seam on the inside of the gloves. I really don’t think that’ll bother him or be noticeable at all.


Car Seat Canopy Tutorial

I did have a car seat canopy from Eden that was still in great shape, but I didn’t really want to tote the little guy around town under a pink owl and floral design, so I decided to make one, more suitable for him. The outside fabric I used was a canvas fabric and then the inner cloth was just cotton fabric. I used my friend Valeri’s tutorial here. She was the one who helped me make my first one for Eden, so I knew right where to go for a great tutorial. Oh, notice that she used lace for the straps on hers. If you plan to use fabric and opt out of lace, like I did, be sure to get an extra ¼ yard of the top fabric so you have enough to make some straps.


Boppy Cover Tutorial

I used this tutorial to create a new cover for my boppy pillow. I have only ever had one cover, but when it gets spit up on it, it will be nice to have an alternative while the dirty one is getting washed. This tutorial does require you to fold a bobby cover in half and trace it with a 1/2 inch seam allowance, so if you don't have one to begin with you will need to find a pattern online to use...which there are tons. I just preferred to trace mine and know that it would fit my pillow more exactly. I went with two different fabrics, a cream colored cotton with white triangles on one side and a gray minky fabric on the other and a gray zipper.


360 Degree Nursing Cover Tutorial

As a new experience for me, a pretty conservative person in general, I found nursing in public and even small groups to be uncomfortable. Mainly because, by the time I was able to get to nursing Eden, she was usually already thrashing her limbs around like a wild banshee and it took a lot of effort not to have my blanket or whatever I was using as a nursing cover, flung wide open. If I could have felt more securely covered, my nursing stress level would have been extremely minimized. A year or two ago, while I was at the zoo I watched a girl get ready to nurse, by slipping a cover over her that wrapped 360 degrees around her. Basically, it wasn’t going anywhere. I immediately decided I NEEDED one of those with my next baby. I began to see them around more and more, but again…didn’t want to fork out the $30-$50 to get one.  I decided to make my own. I bought two yards of jersey knit fabric (which was more than enough) from Walmart for like $4 per yard and got to work – it was probably the easiest things I made for the kid (and me I guess)! I did end up sewing a large pocket on it as well, so I could stuff it all into the pocket to transport it easier…cause I am bringing this thing everywhere! See Tutorial below.  

I made my cover more narrow at the shoulders and wider through the body

The opening of the pocket aligns the bottom of the cover
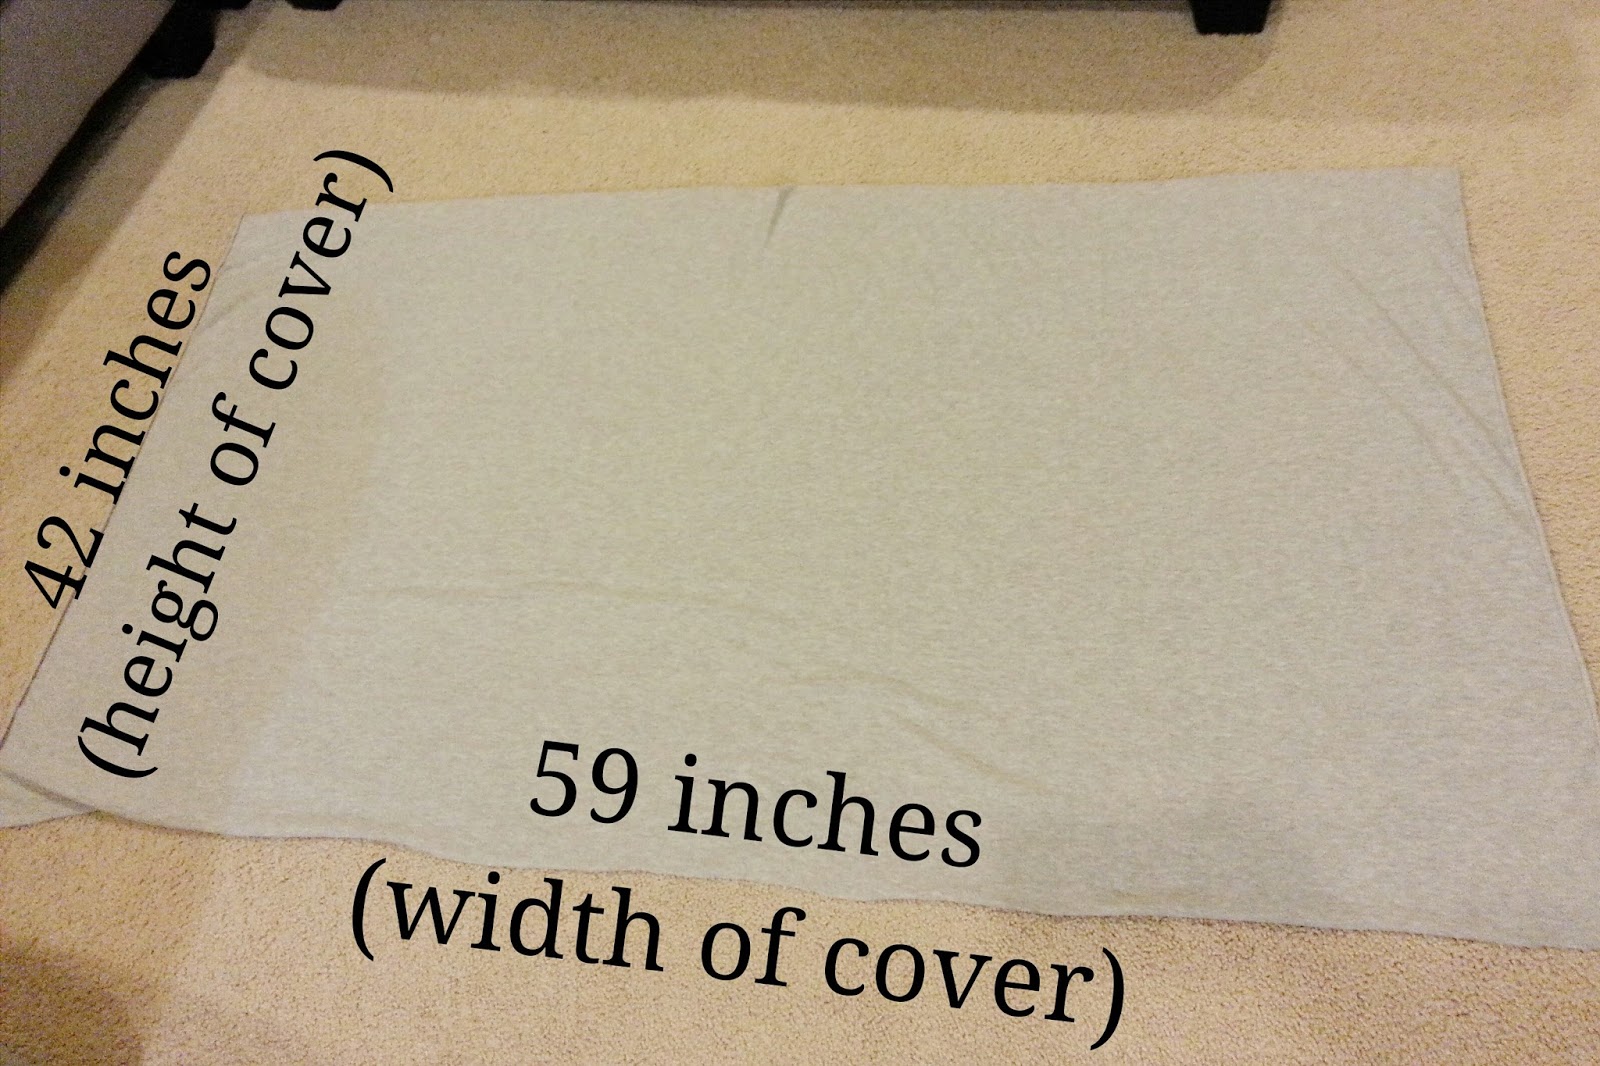

The fabric I purchase was about 59 inches wide (and the stretch of the fabric ran width wise – which you can tell by stretching the fabric with your hands to see which way has the most give). This I the part that would wrap around my body 360 degress. I ended up getting 2 yards cut for the length of the cover, but only needing 1 yard + 6 inches for the cover and about 10 more inches for the pocket - so overall I would recommend getting 1 1/2 yards to be safe. Although how much length you get cut depends on how long you would like the cover to be from your head/neck to your knees . I am 5”6 and found that I really liked the 42 inch length that I ended up trimming my two yards down to in the end. I also left the top and bottom edges raw since the jersey knit won’t fray, but if you want to fold over the edge and put a zigzag stitch (make sure it is a tight zigzag so you do not restrict the stretch from side to side) then factor in an extra ½ inch-1 inch for seam allowance. After I cut my piece I ended up with a 42in x 59 in rectangle.


I decided to make the fabric that would be around my shoulders more narrow so it wouldn’t slip down over me while nursing, by shortening one of the 59in sides. To do this fold the rectangle of fabric in half so that the  59inch sides are lined up (fold with inside out so that you can pin and sew and then flip and have the seam on the inside).  Once you have the fabric folded and lined up, measure the top from the folded edge and make a mark at 21 inches. Draw a line from the 21 inch mark to the bottom corner of bottom side, so that side will remain 59 inches wide. Then cut along the diagonal line you just drew and remove those skinny triangular shaped pieces, If you would like to fold the edges of the top and bottom over and sew them, this would be the point to do that. I skipped that step and left them raw since the won't fray anyways. 


Then pin the freshly cut edges together and sew them with a straight stitch at 1/4in seam allowance. Then follow up the straight stitch with a nice zigzag stitch to finish the edge and secure it...unless of course you have a serger in which case you can just serge the edge.


Now if you would like to add a pocket (refer to picture above for a visual), create a pattern by drawing a 9.5in x 7.5in rectangle –pin it to the extra fabric so the stretch is in the width and cut it out. Then fold the longer side down 1 ¼ inches and iron to make a crease before sewing it with a 1/4in seam allowance to create the top of the pocket. I used a twin needle to sew since my stitch was going width wise and I didn't want to ruin the stretch. If you don't have a twin needle do a tight zigzag. the fold the two side edges and the bottom edges of the pocket in 1/4 inch and iron them to crease them before pinning the pocket to the cover by aligning the top of the pocket with the bottom of the cover and one side of the pocket with the seam running down the cover. then I sew the the pocket to the cover with a twin needle. Again, use a zigzag stitch for anything you are sewing with the stretch of the fabric if you don't have a twin needle. In the end, when I fold my cover inside the pocket the pocket ends up being inside out, or having raw edges visible from the inside of the pocket. I would rather have it like this and have it look nice on the outside of my cover when it is un-tucked, but if you'd like your pocket to have finished seams when the cover is all tucked into it, sew the pocket to the inside of the cover and it will be right side out when you tuck it in. 


Hooded Towel Tutorial

I was given a hooded towel for Eden, made from a normal size towel and a hand towel (as the hood). I had a few baby towels as well, but the home made hooded towel was always my go to, because those thin little hooded baby towels didn’t soak of very much water at all and I found they were always soaking after bath time. I was able to get Eden dryer and keep her warmer in the home made towel. She still likes using her towel to this day and she is almost 4. I decided that instead of her thinking baby brother is taking over ALL of her things, that I would just make him his own so that she could use hers whenever she wanted. Plus hers happens to be purple, which isn’t the end of the world, but why not make the little guy a more many grey one? I used a combo of tutorials, but had I stumbled across this one originally, I would have used it. Mine came out pretty similar other than the cuff on the hood.


3.28.2016

Easter Treats (Coconut Cream Cake & Italian Easter Cookies)

Coconut Cream Cake


I always notice delicious looking and festive white cakes covered in coconut for Easter on social media, surrounding the holiday. This year, I needed one - I am eating for two ya know?!  And they just look too good- aaaaand my glucose test isn't until Wednesday! I found a recipe and decided to make a few adjustments to it and it turned out delicious, moist, coconut-y, and had cream cheese frosting. Does it get better? Well, for a dessert that doesn't contain chocolate anyway, no, I don't think it does! What I'm saying is, I'd recommend the thing! The original recipe can be found here.

These are the adjustments I made:

Instead of 1 stick of butter and 1 cup of canola oil, I used 2 sticks of butter (1cup) and 1/2 cup of sour cream.

Instead of doing frosting in between the layers, I filled each layer with coconut instant pudding. I used almost and entire 3.4oz box between the two layers. Then I found that I only needed to make 3/4 of the frosting recipe to frost the top and sides of the cake.

Finally, I opted out of adding the pecans to the frosting, only because my baking assistant disapproved, and I wanted her to enjoy the cake too, otherwise, I totally would have had them in there and I think it would have been all the yummier!

If I remake this cake, the only change I would make is to lighten the cake a bit by replacing some of the flour with corn starch as show here.

Pre-frosted 3 layers

Anytime I bake anything, Eden is right there scooting her chair across the kitchen floor to assist me, asking, "Whacha makin'? Can I help?!" <3


Italian Easter Cookies


When I was living in Italy for a church mission, I came across these super fun and yummy Easter cookies called Cuddura di Pasqua. Reed and I are always trying to to figure out ways to bring our mission cultures into the home and into our traditions. So this year I sifted through some recipes until I found this one (which I translated at the bottom of the post). I made a few adjustments to it, and converted the ingredients from the metric system, since I don't have a food scale. I also cut the batch in half and actually could have just done a quarter batch since one cookie/egg was enough to fill each person. Also, in Italy there are many shapes they use for this cookie and typically they cross two pieces of dough over the egg, perpendicular to each other, to symbolize the cross. This year, I went with a basket design. 

We decided to color our eggs first, but obviously, you can use plain hard boiled eggs. 


Then I made the dough and chilled it in the fridge while our eggs were drying. When it was chilled I pressed it out with my hands and cut out 6 circles. Then I took myself back to my playdoh days and started rolling our a bunch of snakes with the remaining dough. I twisted two snakes together and laid it around the circles of dough. Then I placed the eggs in the center of each and made more twisted pieces to lay over each egg as a basket handle. 


After this I basted each basket with beaten egg (one egg is more than enough) and covered them each with sprinkles, before baking them.


After the cookies are baked, they need to be stored in the fridge until it's time to eat 'em.


Cuddura di Pasqua

Wait to preheat the oven until the dough is chilled (around an hour or so) and you are ready prep the dough to be baked. 

(for 6 large cookies)
In a large mixing bowl combine:
-4 cups of flour
-1 cup of sugar
-1/2 tsp baking soda
-1/2 TBSP baking powder
-Pinch of Salt
Blend dry ingredients with a whisk, then add:
-1 stick of butter (slightly softened and cut in slices)
-2 eggs
-1/3 Cup milk
-1 tsp vanilla extract
-Grated peel of one lemon
You can mix the batter together in a food processor and then knead it, but I just kneaded all of the ingredients from the get go with my hands until a ball of dough formed. You may need to add a little more milk or flour, but wait to see how the dough forms after working it for a while first. You want a pretty thick dough that's not too sticky. 
Chill dough (around an hour)
Preheat oven to 400 degrees (IMPORTANT: decrease heat to 350 once you place cookies in the oven). 
Shape dough and then add one HARD BOILED egg to the middle of each cookie (6).
Baste dough generously with beaten egg.
Sprinkle with sprinkles
Bake for 20 Mins (rotate pan 180 halfway through cooking)
Allow cookies to cool and then refrigerate them until ready to be eaten. 


Easter 2016


Eden had an Easter party last Thursday at her preschool and couldn’t get over the excitement of the impending holiday. She came home with eleven eggs that she had me hide over and over and over again for her to find. I knew she was really serious about this Easter business when she asked me to hide them that night and said to come wake her up and pretend like the Easter Bunny had come in the morning. I told her that most likely she would wake up first and come get me up…which is the usual routine, unless we have preschool or somewhere to be. She was adamant though and said she would wait in her room for me to come. When I woke up, she was just chatting away to herself in her room, patiently waiting almost 45 minutes later than she would have normally come into my room to get me.  I giggled to myself at her determination, hid the eggs, and came and told her the Easter Bunny had come.  With squeals of delight she took her basket and began finding eggs!

Needless to say, she got in lots of practice finding eggs before Easter morning. She came in a 7:15 Easter morning informing me and Reed that the Easter Bunny had come! We followed his footprints out to her basket with her, she proudly showed off her basket loot (she was most excited about the peeps, and all week kept saying that she hoped the Easter Bunny would bring her some -bleh! We differ with that one) and then she began collecting all of the eggs.  There were three light pink eggs that had surprises in them other than candy – one had a whole dollar, and two others had shopkins (this would explain why she only went for the pink eggs at her grandma and grandpa’s house during another egg hunt that evening J ). After the eggs were collected we enjoyed our breakfast. I had made some typical Italian Easter cookies with hardboiled eggs in the middle, that I hadn’t had since I had eaten them on my mission for Easter breakfast in Italy (see recipe in succeeding post).  I think they will be a yearly tradition!


We had a relaxing morning, talking about the resurrection of our Savior, listening to church tunes, eating waaaaay to much candy and a little bit of lunch, and getting ready for church. Church wasn’t just extra special because it was Easter, but it was also Eden’s very first talk in primary! She spoke on prophets and how Heavenly Father speaks to us through them. I wanted to work on the talk with her all week, but with the busy week we had, we didn’t even get her talk together till Saturday. She nailed it though! By the time she was supposed to give it, she had part of it memorized and could read through the rest. Reed and I definitely felt proud watching our little tyke fearlessly and excitedly give her first talk <3. 


After church, we went to grandma and grandpa Doxey’s house where we were joined by other family, including Eden’s cousin Nixon. She is always so excited to spend time with Nixon – both of them have been only children for quite some time and they both play so well together!
We enjoyed a nice Easter BBQ of hamburgers and hot dogs and we were not lacking in dessert, since each family there happened to bring one, haha! Heaven! After dinner Eden and Nixon played downstairs while the Easter Bunny visited the backyard. Then we set them loose! Nixon was like a little egg collecting tornado – Eden, was a little distracted by all of the pink eggs and began looking specifically for them, passing lots of other eggs in her path, haha. In the end they both had a great reaping in their baskets to take home.


I sure do love holidays with my family- holidays and traditions make life that much better! 

3.20.2016

San Fran Trip


I find it odd that my first two blog posts happen to involve San Francisco…even though my trips out there happened about 6 years apart. Last week we were able to take a much needed trip, since Reed had spring break for his MBA program.  It was also a good opportunity to spend some two on one time with Eden Bug before her little brother makes his debut in June. The other awesome part about this trip was that we were able to stay with my college bestie and her fam, who we hadn’t seen for two and a half years. They were so kind to house us while we were there and we loved the time we were able to spend together on the weekends. Get ready for a photo and info overload!

Leaving Provo

We flew into Oakland, and I am guessing this may be the first flight Eden may actually remember in her later years. She loved the whole experience of flying and when we hit a lot of turbulence flying in she kept saying “Wheee! Wheee!” until that turbulence rocked her fast asleep for the landing. We flew into a cool and rainy bay area which made for a very green trip. Luckily it didn’t rain the whole time we were there, but we were glad to see so much moisture that was long overdue with the drought Cali had been experiencing.

Gangsta Posing in Oakland
First thing off the plane, Diana and Trevor picked us up and we headed straight to Fenton’s restaurant in Oakland for some yummy burgers and ice cream. I normally always get ice cream with chocolate in it, but boy do I love Fenton’s Banana Nut ice cream – it is a must if you like bananas! The cookie dough and chocolate peanut butter crunch did not disappoint either! On the way home we made a pass by the beautiful Oakland temple just as the sun was almost set.


Oakland, CA Temple
The weekend was rainy and made for a perfect visit to a lighthouse on the coast. This was my first time visiting a light house (or even seeing one in real life besides at a distance on the Maine coast when I was 16). It was breathtaking and the rain stopped, and the sun peeked through the clouds just long enough for us to hike to the lighthouse and back.


The rest of the weekend we took it easy and had fun celebrating Diana’s 30th birthday. I hadn’t
been with her to celebrate her birthday since we both turned twenty, ten years ago! It was so fun being together and she is such a beautiful 30 year old mama and wife, who has accomplished lots of wonderful things in her lifetime! It was really neat reminiscing our college days, of dreaming of what our families would be like and then actually seeing it all unfold before our eyes as we watched our kids play together. Eden and Grayson really hit it off and each day that we left for trip adventures, Eden was always sad if he wasn't coming along...it was pretty stinkin’ cute!

On Monday morning we headed straight for the Jelly Belly factory (Eden’s favorite part of the trip). My pregnant self was a little hesitant to try the abnormal flavors, life vomit and booger, but I did muster up the stomach to try grass…which really tasted like grass. It wasn’t my favorite, but it wasn’t too bad either. I really liked the chili mango one, that was sweet with a kick of heat. We kind of felt like we were visiting Willy Wonka’s as we walked through the factory and learned about the process of making the Jelly Bellys and got to try samples at the different steps in the process. The robotics in the factory were amazing and we couldn’t believe the jelly beans upon jelly beans that we were seeing all over! It was crazy to learn that it takes almost a whole week just to make a jelly bean there! Before leaving we each created our own mixes of our favorite flavors and ended up with over a pound and a half of jelly beans J


After the factory we took a drive through the beautiful wine country of Napa and made a pit stop in downtown for some burgers at Burgerfi…yeah those burgers were amazing…or as Eden says, “Yummilicious!”.  Then we made a pit stop at a park there, which was fun, just hanging out among the locals, soaking up the sunshine and snacking on jelly beans.


Tuesday was our big San Fran day, where we hit all the things we wanted to do in the city. Boy did we eat well that day and sleep well that night! The weather was beautiful and the parking was ugly J.  First thing, we stopped at the bridge overlook, before heading into the city and hitting up Fisherman’s Warf. Reed and I had both had bread bowls there at Boudin before and decided to try a pizza on sourdough this time around…which did not disappoint! Then we headed for Ghiradelli to snag a brownie sundae and some chocolate( I can’t maintain this belly of mine by eating nothin’ ;) ). Then we headed to China Town to try some dim sum, pot stickers, Chinese pastries, and to get Eden her souvenirs from the trip. She has really been loving Mulan lately and was set on finding some goods there. We found her a fan and an umbrella on our hunt and also had to hunt for a potty, which was not an easy find, but luckily we were able to find one before anything disastrous happened. Then we made our way to the Painted Ladies houses (Full House) where we ate some more pastries and Eden modeled her new gifts, and played on a playground there…boy did that playground have a saweet view! Lastly, we made a stop at the Palace of Fine Arts Theatre on our way out of the city. This time around we did not do the crooked Lombard street, a bay tour with Alcatraz, or the Golden Gate Park since we both had done those on earlier trips, but I do really like all of those place as well! After we got out of the city we made our last stop of the night in San Rafael because there is this Crepe shop there that I love called Crepevine (and to let traffic die down a bit). We tried the Tuscany savory crepe and the Santorini sweet crepe (which was yummy, but we both would have preferred one loaded with nutella goodness more though).


One of the biggest selling points for Reed on going to San Fran, was the fact that they have Broadway shows and that Wicked just happened to be there. He had never been to a Broadway show and I had talked about how amazing Wicked was a number of times. Since kids under 8 weren’t permitted to the show, we were super lucky that Diana was willing to watch Eden for us so that we could sneak away for a date. We both wore our Sunday best and headed into the city to the Orpheum theater . The show was just wonderful – it is an easy musical to follow and the musical that made me start liking musicals in general. There were tons of experienced actors in the cast and there was definitely no skimping on the special effects.


 Thursday Diana, Trevor, and the kids were able to join us on our adventures, which was so nice since it was our last day to explore before flying out at 7am the next morning (Yuck)! We were super lucky to have Trevor to show us around  the sweet spots, since he grew up in the bay area and as a police officer has become even more familiar with that area! We all grabbed some delicious sandwiches from Mr. Pickles Sandwich shop and had a little picnic outside of Muir Woods before heading in for a nice long walk. The scenery of the redwood forest there was so beautiful and peaceful. Every time we rounded a curve in the trail I wanted to take more pictures (even though the pictures just couldn’t do this place justice). Then we headed to the beach, to run around on the sand and get our feet wet…well everyone who wasn’t pregnant and wearing compression stockings got their feet wet J. Eden was in heaven there! Squealing as she dug in the sand for treasures and dipped her feet in the cold bay water. I was in heaven just watching her and trying to catch some pictures of her running around. I loved the rock formations in the water there—probably because that is something I never saw on the beaches of Florida where I grew up—everything is just flat there. On the way home that night we drove through Sausalito and saw the most gorgeous homes with the prettiest views and experienced the horrible traffic.  We passed by these amazing soccer fields set down in a valley or green hills there, that was just breathtaking and made me wish I had grown up playing on those fields! We stopped for some dinner to let traffic die down again, headed home and packed for our early flight the next morning.


Boy did that week fly by fast!